Chances are, if you’re making videos on YouTube and trying to get views for them, then you’ve got a complete video making process of your own. If not, then you definitely need to start one. In this article, I’m going to go through the 10 steps I use for all of my YouTube Videos. Within there, I’ll throw in some quick tips to make better YouTube videos for your channel.
To make YouTube videos which people will actually watch and stay watching, you have to go above and beyond just pointing, shooting, and uploading. Sure, videos go viral everyday like this, but it’s all pretty random. Building a consistent audience not only takes time, but takes a little effort. People will know the difference between a half-assed video and one you actually tried to make good.
What’s that saying… ? “If You Build It, They will Come”. It’s no different with your YouTube videos. If you put in the effort, people will show up, watch, and follow.
Prime Example
Just as a little proof for this point, the topic for this article was actually brought up during a conversation with one of my viewers! Definitely the first time this has happened, but a very welcomed instance. Also, how cool is it that I not only have viewers, but some authority in the space now? It could be no different for you and your YouTube channel.
This viewer is wanting to start her own YouTube channel, but is unsure of the process of making videos for YouTube. She was more into the editing portion vs the SEO, Analytics, and super technical stuff, but it got me thinking, for sure. There’s actually a TON that goes into my complete video making process, but I think I’ve whittled it down to the following 10 steps… Possibly with bonus steps.
Step One – Research and Planning
Hey… I did say this was the complete video making process, right? Right. And my process starts before I even touch a camera or editing software. The first step if you’re looking to get educated views for your videos is going to be your research and planning. If you’re not worried about that, you can skip that step… but then I’m confused as to why you’re reading this article in the first place. Oh well…
Topic Research
This probably goes without saying, but if you’re going to speak on a topic, then you should probably know something about said topic… Hey, I get it! You already know that, but you gotta understand that some people actually skip this step and just say whatever they think is correct. The only thing this is going to do is hurt you and your cred. If your viewers get wronged by bad information you’ve given them, believe me… They won’t be your viewers long.
Get on Google, get on YouTube, get on Facebook, and do your research. Is using information you find in articles or other YouTubers’ videos stealing? THAT… is a good question. The method I use for this kinda thing is to cite my sources. Counter-intuitively to what you may think, this will actually help your videos, in my opinion. By relating your facts to credible sources, people will know you’re actually doing your research and know what you’re talking about.
Sure, some of those people may leave your channel to go to that person’s channel, but even if they do… You’re now going to be related to that other channel in this person’s eyes. It’s a solid means of building some credibility by tying your channel together with authoritative figures.
In certain topics, you may need to get on social media or even ask your viewers for ideas or information.This is a great thing and will help to build relationships with your audience. Doing this will ensure your viewers stay engaged with your channel and know you care about them and their opinions.
Keyword Research
So, you’ve got a topic you want to shoot and know all about it now. So what? How will people ever see your video with all the content uploaded to YouTube everyday? Well, this is the first of the quick tips to make better YouTube videos I have for you: Keyword Research.
Click this sentence and go check out TubeBuddy. If you’re serious about getting views for your videos and growing your channel, then you can’t skip out on this step. The above link is an affiliate link, but it doesn’t add anything to the service, and actually, you can download and use TubeBuddy 100% FREE of charge. Actually, by using that link above, you’ll actually be helping me to continue producing this content for you. So, thank you in advance.
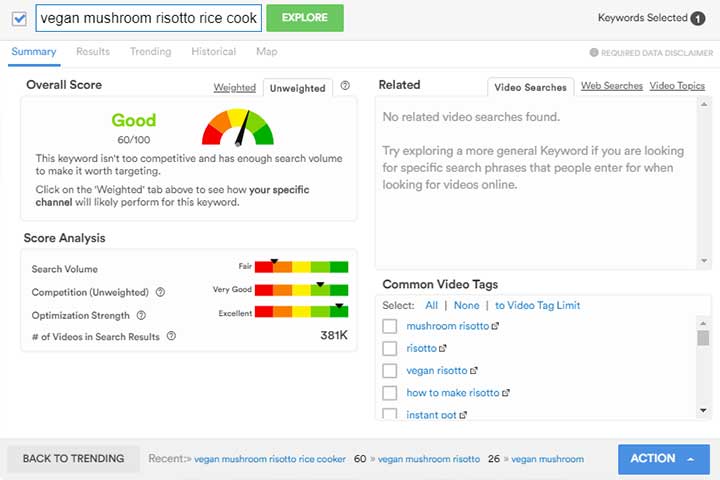
Anyway, what is TubeBuddy? It’s definitely a ton of things, but for this step, it’s a keyword researcher to see how well the keywords in your topic are going to do on the YouTube platform. In the example in the picture, I tried searching for “Vegan Mushroom Risotto”, as if it were something for which I would make a video.
Thanks to TubeBuddy, we know this may not be the best topic for which to try to make a video… Or maybe it’s just not the best keyword. TubeBuddy to the rescue! Features of this extension are common tags for this keyword, as well as related keywords. So, I click one of the related keywords and just like that, I find keywords for a video worth shooting!
… If only I had started a cooking channel vs an advice channel for small YouTubers… ¯\_(ツ)_/¯
Step Two – Outline

Alright, so now we’ve researched chosen our topic, done a good amount of research, and know what keywords we’re going to target thanks to TubeBuddy. Now, the next step is to organize our thoughts for when we actually record. Often more so than others, I promote rambling, but not rambling without a point. While, I do think rambling can bring out some character, if you don’t know your point, it will more likely hurt your videos.
This is where an outline can come in handy. By organizing your thoughts either via paper or Google Doc (or even via blog article), you’ll be able to set up a flow for what it is you’re about to say to the camera. While this isn’t absolutely necessary for all, it is HIGHLY recommended for most. Aside from the flow of the video, it also will help you to get all your ideas out there. So, you can assuredly not forget anything you want to say.
This is a step I usually include in both my complete video making process AND my blog making process.
Step Three – Make Coffee/Shoot Some Video
Why make coffee? Cause you’re going to want to put your best face forward and most of the time (at least, if you’re like me) this is going to come with a healthy dose of caffeine. It takes livelihood and energy to woo an audience. If you’re tired, monotone, and/or bored, it’s going to come across to your viewers, and they’re not going to want to stick around. So, before you start this step, get in the kitchen, break out your current bag from Trade Coffee (First bag’s free with that link!), and make yourself a pour over (or an espresso with this great entry level machine like I just got!).
Alright… Coffee in hand, let’s turn on the camera and equipment…
Testing.. 1. 2.
BEFORE YOU START… Please. PLEEEASE test your equipment. I get you maybe haven’t moved anything since your last video, but please take my word for it and test your equipment. Make sure everything is working and looks how you want before committing to the whole shoot.
It’s admittedly already happened to me a coupla times where I’ve just finished shooting for my video, uploaded my video, and found something like the fan in my room I wasn’t thinking about has created a terrible buzzing sound allll the way throughout my video. Trust me. It’ll only take a minute and you’ll thank yourself later.
This isn’t the largest of the quick tips to make better YouTube videos, but one you should surely remember to do.
The Shoot
This is all the way in the second half of the third step of this thing?! Isn’t this where most people start this kind of article??? Maybe! But I’m giving you my complete video making process and I want you to be prepared and completely well equipped for making better YouTube videos for your channel. So, I’m giving you all I know to do.
When I shoot for my videos, I definitely try to clear out enough time to get it all done in one go. That’s not always possible for everyone, but if you can do it, it’ll save you from some headaches later. Set up for the various angles you want, if using multiple cameras, and grind it out. If you’ve outlined well and are prepared with what you want to talk about, then this step shouldn’t take too long. For my video on “Best Video Length”, I was so prepared, it only took me about 22 minutes to record for the whole video.
One troubling thing to note with that video is a perfect example why I say to shoot it all in one go and especially to test before you shoot. I recorded the video in the morning and later in the day, I thought of something else I really wanted to include in the video. So, I tried to quickly shoot this little section.
It was now late afternoon and the room had a west facing window. When I got to editing, my face and the background were SUPER orange from the sun and I also forgot about that damned fan. Unfortunately, the clip was too good. So, I just made it work, but had I just tested before starting, I woulda saved myself a good amount of time.
ScreenCaps
This is just a little note, but when recording for a video which features screen captures, I like to try to get these done while I’m shooting. Alternatively, you can do them while you’re editing, so you know specifically how long you have for each capture. I will generally record some sort of extra audio with my screen caps, though. Since I’m already in this performance kinda mode, It’s a good idea to get these done right here.
Step Four – Two Thumbs Up… Maybe Three? Four?
Apologies for the cheesy title, but this is where I would be taking pics for my thumbnail. I could have added this to the last step, I suppose, but I want this way I think I can reinforce its importance. YouTube does provide you with a feature where you can use any ol’ Randy screen capture from your video for your thumbnail, but don’t go this route! At least, not if you’re looking to get the optimal number of views for your video.
The next of the quick tips to make better YouTube videos: when you’re making a video which you actually want to promote and get people to click, you have to shoot some extra shots for your thumbnail. Try some funny faces or a surprised look, maybe. Take as many as you like (like the cheesy title, right?), but make sure they’re high quality and clear. Keep em around for the step coming up where you actually edit them.
Step Five – Editing
Step five is kind of a big step, but also a pretty standard step. You’re welcome to skip this step, if you’re not really worried about getting views or holding viewer’s attention. If you are looking for these kinda things, then I HIGHLY suggest downloading some sort of editing software and cleaning up your raw videos. For a list of editing software, you can check out my article on “How to Start a YouTube” where I list some of the more popular ones.
Cuts and Rearranging
Since this is a complete video making process list, I’ll include all the things I do while editing a video. You’re first going to want to cut out all the breaths you breath in the video. Unless, of course, it’s an intentional, point-making breath, of sorts. Then leave it in, but otherwise… No one wants to watch or hear you breathe. It’s a break in the action and a chance to let the viewer get distracted or bored with what they’re watching, and possibly leave your channel.
It may go without saying, but you may also want to rearrange the video in your edits. Here is a great place to do it because you’re already looking for things to cut out. So, you can cut sentences in half and paste together, if necessary. You definitely want to get this part done earlier cause it just gets more difficult later on.
Markers – A Super Quick Tips to Make Better YouTube Videos
Secondly, mark everything. Every time you switch points, throw in a marker of sorts. Beit a title scene or an actual marker, like in Davinci. Highlight that moment somehow. Then when you come back to it to insert a transition, it will be easier to find. I also mark any time I jump cut in/out, and any other break in the action. Along with learning your hotkeys, markers are a very handy idea and rightly belongs in the list of quick tips to make better YouTube videos.
Sound
This step goes together with a step coming up about music, but paying attention to the sound levels in your video is very important. You want to make sure each clip is about as loud as the others. A break in the sound quality can cause a distraction, and you guessed it… This could give your viewer an opportunity to lose focus and leave your video. Also, make sure it’s not too loud or quiet as a whole. A good way to do this is to play it and compare to other YouTube videos in your genre.
Color Grading
This is definitely a step that goes a little bit above and beyond, but one I’m slowly learning. Once you get into your intermediate editing days, you’ll probably run into color grading. Essentially, color grading is when you fix or refine the colors of your video. Actually doing it is not as easy as describing it, though. So, until you’re feeling comfortable with your editing software and maybe know some color theory, it’s okay to skip this step.
Although, I will say that the difference is SUPER noticeable between a nicely color graded video and a raw video, in my opinion. Not all viewers will notice this step, but the ones who do will definitely be pleased, if you do this part well. It surely gives your video a more professional look and may make them easier to watch.
Step Six – Transitions
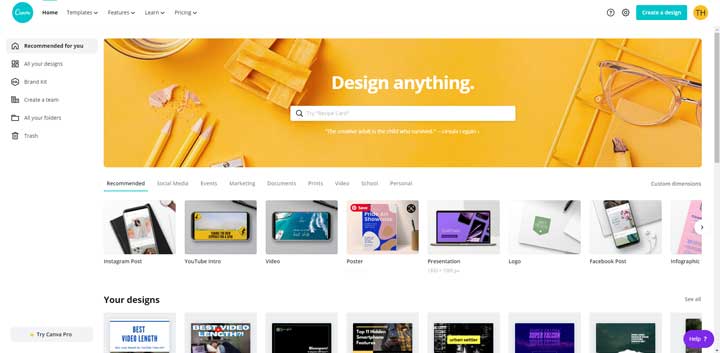
If you didn’t do this already in your editing step via titles, I’m going to throw transitions in right here. I’m doing this because, for me, it requires me to go out of my editing software to complete. My next of the quick tips to make better YouTube videos is Canva and this is where we’ll be heading to make some transitions (no pun intended).
If you’re not already on Canva, you gotta sign up. This is one of the best resources I’ve come across for making free (and good) transitions for your videos, among other things which we’ll discuss shortly. I like to use a low action video in the background or to animate the text to give them an interesting effect. It’s not necessary, but you may also want to include your branding on these like your logo!
Step Seven – Music
Alright! We’re really getting through this complete video making process and I hope you are enjoying the quick tips to make better YouTube videos. There’s more to follow.
Step seven is all about finding and using some music for your video. If you’re unsure of where to go to find good or free music for your videos, I wrote an article on this very topic. Go and pick out your favorite songs and bring em back with you. We’re going to throw them in the editor.
Since making the video for that article about free music, I’ve started to like to include music all the way through my videos. It may be extra sauce, but I also like to cut the track so it has a seamless transition (from beat to beat) to the next track. If you’re going to do this, you have to make sure it’s quiet enough that it won’t distract your viewers… you know what happens if they “lose focus”. I will cut it and turn it up during transitions, but whenever I’m speaking, it’s super low. Finding the right volume just kinda takes practice.
Step Eight – Publish Your Video
Wait, this gets its own entire step???
Yes, it does, and I’ll tell you why. It’s an important step, this is my blog, and I think it should have its own step. ¯\_(ツ)_/¯ Or as I say… “Demi Lovato!”
Anyway, the only thing I want to point out here is to make sure you’re publishing your video for at least 1080p. There is something to note about making sure frame rates when exporting match those of the footage you imported, but that’s more of an advanced editing tip. So, I’m leaving it out for now. **Wink**
Step Nine – Thumbnail
Remember the last of the quick tips to make better YouTube videos in this complete video making process? That’s right… Canva. Like I said, this is quite the do it all tool and if you didn’t sign up back in that step, do it now. We’re going to use it in this step and we’re going to use it again in another step coming up. So, stop fighting it.
Grab those pics you took before for your thumbnail, run em through Lightroom or Photoshop, and head on over to Canva. Once there, search for YouTube Thumbnail and you’ll instantly be rewarded with a ton of design templates. If you can’t find one which is juuust right, then click on one which is close enough. Canva is almost completely customizable. So, if you can find something which inspires you, but isn’t perfect, you can then go in there and tweak it to your liking.
Step Ten – Upload All The Things
We made it!?! We made it all the way through this complete video making process. So, let’s get to it then. The final step is actually quite a large step. Large enough I would suggest going up to the video embedded above and checking out some of the screen cap regarding this step.
Page One
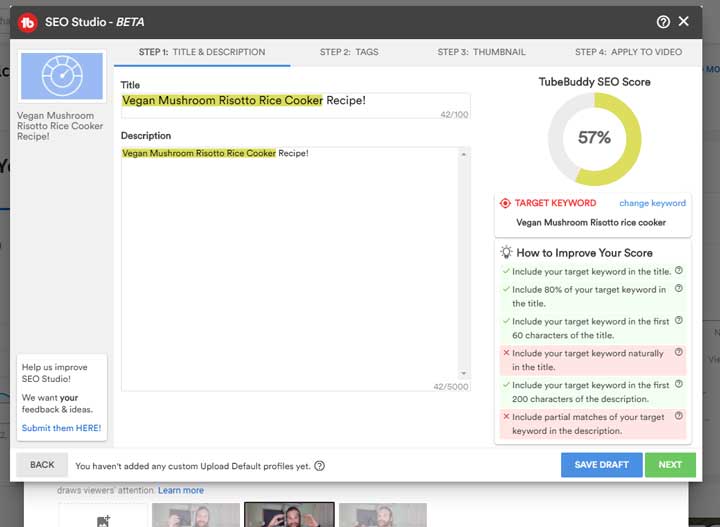
When “Creating a Video” on YouTube, the uploader is broken into three pages. So, that’s how I’ll set up this explanation. Again, if you don’t already have TubeBuddy, you’re REALLY going to want it here. It’s just such a good app for all things involving getting your video views, and what I’ll be using in this step. You should be able to follow along regardless, but you’ll lose out on the great tools. So… click the TubeBuddy icon on your uploader and open up your SEO Studio.
The first thing you’ll want to do is create your title and description. This is the place where you will use the keywords you researched in the first step. When creating a title, try to use the full 100 characters or as close to it as you can. You wanna squeeze all the juice out to the title fruit that you can. This is less so important with your description, but either way you want to make sure you’re using high quality keywords and to get the best result. Once your title and description pass the TubeBuddy standards, click next.
Upload your fancy new thumbnail to the video. If you skipped this step, pick an interesting photo from the three listed, but I HIGHLY recommend you don’t skip this step.
With your tags, you’ll want to use the keywords you researched before. You’ll also get a chance to throw in some similar keywords. This way you can get a chance to be featured for all the various terms and phrases people search when looking for a specific topic. Tags aren’t HUGE for getting you recognized, as your title, description, and video content are optimized for other things, but they’re still a way to get your foot in the door.
Page Two
This page is short but super important for getting your viewers to move around your other content and watch more of your videos.
Cards are those lil blips of text which show up throughout someone’s video, when they say something like, “If you want to know more, check on my video on…”. It gives you a chance to highlight your other videos. Hopefully, this gets you more watch time. If you’re not sure what to write, TubeBuddy is full of suggestions.
End screens have pretty much the same purpose, but you guess it… They show up at the end of your video. I always include a special outro transition here to allow for a better end screen layout. Here, you’ll get a chance to highlight more of your videos and/or include a button to subscribe to your channel. I would highly recommend not skipping either of these steps.
Page Three
I don’t know if there’s anything I should write here, but it is a page. So… Click whether you want to publish your video privately or publicly. If you’re trying to get views, I would suggest selecting “Public” , so everyone can see it. You also have a chance here to schedule when your video will be uploaded. If you’re good about getting your videos done early, you can essentially get them all uploaded, set the schedule to get them published, and just forget about it.
That’s it! That’s the Complete Video Making Process
That about does it for this very lengthy article! I think I’ll have to go back through and further break down some of the topics into smaller articles. There’s so much to say and not enough space to quickly say it and give good examples. I think it would be greatly helpful to have some examples with which to work.
Get Views FAST with The Last of the Quick Tips to Make Better YouTube Videos
Before I go, I’m going to leave you with a super quick and easy way to get views for your new YouTube video….
Share it! Share it on all the things. Facebook, Insta, Pinterest… Or even write a blog about it. Let everyone know you’ve made a new video. I know it’s scary! I still have a tough time sharing it on Facebook, but here’s the thing. If people don’t wanna watch it, then they won’t! If they do, then that’s one more view you wouldn’t have gotten had you not shared it. And when you’re a small YouTuber, those views really make all the difference for your motivation.
If you gave in and signed up for Canva, you now have access to templates optimized for all the various social media platforms. Also, if you use a WordPress site, I would recommend checking out Social Web Suite. You’ll be able to schedule and share to all the social platforms with ease. It does cost money, but a good social media manager is well worth the cost.
Consider adding this to your YouTube board on Pinterest
If you found this article useful, drop a comment and lemme know! I’d love to hear from you. You can also stop by my YouTube channel and check out all the helpful topics I have to share. While you’re there, subscribe and gimme some thumbs up! It’ll very greatly help my cause.
If you have any questions, you can either leave a comment for me, or you can fill out the form below! I’d be more than happy to help you in any way I can, feasibly.
Lastly, you should probably know some (but not all) of the links I provide in my articles are affiliate links. This doesn’t mean much and doesn’t cost you anything extra for using them. It really only gives me a portion of the profit if you click on them which does help my cause to create quality content for you. I would NOT endorse anything in which I don’t fully believe to be great, but legally speaking, I have to tell you.
In the meantime, I appreciate you and your time! Thank you for checking out my page and don’t forget… Take it easy.

